Week09_Phonemes and performance

Challenge 10 (Part 1): Phonemes & Performance (Lip Syncing & Facial Animation)

Part 01: Find audio clip

I have chosen a line from the animated film The Lion King as a reference. Here is the audio

Next, I performed and recorded the performance according to the audio. This part was a bit difficult for me because I don’t know how to act, and when I looked at the video I could see that I was acting very unnaturally and the rhythm of my speech didn’t match the audio.

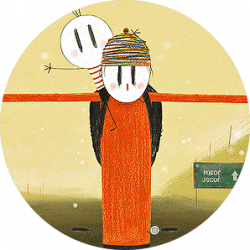
Here is the Jaw animation

Only after I spent a lot of time adding details about the heads to match the audio. I also added a bit of breathing, although it doesn’t look that obvious

Finally, I added some body movements to make the animation look more interesting.

But I think there were still some problems with the rhythm of the speaking, which didn’t seem as natural. I’ll spend some more time practising animating the mouth next, fighting!

Week08_Advanced Body mechanics

Challenge 9 : Advanced Body Mechanics

The shot I chose was boxing footage, which I thought was cool. Before this, I had tried performing boxing myself and recording it, but this didn’t work well because I’m not a professional boxer and I didn’t feel I had a good sense of striking or rhythm, so I eventually chose to go online and find a video of a professional boxer and import it into PR for analysis and processing.

As when making the jump animation, I analysed the video in PR before making it. After determining the timing of each key pose, I then started keyframing in Maya.
During the blocking phase, I focused mainly on the position of the character’s feet and waist to ensure that the character’s centre of gravity was correct

I then smoothed out the curves in the graphics editor and adjusted the rhythm of the animation to make the character’s punches look more powerful.

Finally, I added some lights in Maya and exported the animation, then imported it into AE to add motion blur

Here’s the final result, which looks not bad

Week07_3DEqualizer & Intro to Body Mechanics Part 2

Challenge 8 (Part 2): Adding breakdowns, converting, and clean up & Rendering & Motion Blur / Playblasting & Motion Blur

I polished the curve, after making sure the breakdown poses were great. At this point I noticed that the feet were slipping badly, so I spent a lot of time on fixing the feet in place. This was followed by adjusting the curves in other positions, especially at the waist, as this relates to the whole character’s centre of gravity so that the animation would look more natural.

Before I imported it into AE, I added some lights in Maya so that it looked better.
In AE I added a pixel motion blur to the sequence, which made the jump animation more realistic

Week05_Reference footage and rigs & Intro to Body Mechanics Part 1

Challenge 7: Record/find reference footage

This reference footage was done by me and my roommate, as he is particularly good at jumping. I set up three cameras to record the process

Challenge 8 (Part 1): Setting Up Maya, Exploring Rigs & Blocking Out Body Mechanics

For the rig, I chose the bony rig because the position of his joints was very obvious and this helped me to determine if the pose was correct. In the blocking phase, I started by analysing the movement frame by frame using PR, marking each keyframe on the timeline. This made the blocking part relatively easy for me as I only had to pose the character according to the key time points I analysed.

Week04_Challenge 6 Part 1 & 2

Walking Cycle & Emontional Walking & Walking Cycle Splining & Clean Up

This week is learning about the half body walk cycle, which is closely linked to the small ball bounce work. The walk cycle can express the emotions of the character.
A normal walk is a cycle of 24 or 25 frames. It is important that one foot does not slip after landing on the ground, which greatly affects the character’s sense of weight.

Final works:

thanks for watching

Week04_Work Notes

This week is learning about the half body walk cycle, which is closely linked to the small ball bounce work. The walk cycle can express the emotions of the character.
A normal walk is a cycle of 24 or 25 frames. It is important that one foot does not slip after landing on the ground, which greatly affects the character’s sense of weight.

Here is the hyperlink to the blogs

Week04_Challenge 6 Part 1 & 2

Week03_Ball & tail Animation

Firstly, I found a piano piece, because I wanted to make a piece that resembled a ball dancing, which was very challenging because its tail needed to swing to the music to make it look soft, I spent a lot of time adjusting the swing of the tail. Fortunately, the end result looks pretty good!

Thanks For Watching

Week03_Work Notes

This week I have been learning about Solid drawing and posing, I first found some poses online that I liked and then analysed the structure of these figures, I focused more on the weight of the waist, and the position of the legs.
I found a piano piece and I wanted to make a piece that resembled a ball dancing, which was very challenging because its tail needed to swing to the music to make it look soft, I spent a lot of time adjusting the swing of the tail and the end result looks pretty good!

Here are the hyperlinks to both blogs

Week03_Challenge 4: Solid Posing

Week03_Ball & tail Animation

Week03_Six Solid Posing

This week I have been learning about Solid drawing and posing, I first found some poses online that I liked and then analysed the structure of these figures, I focused more on the weight of the waist, and the position of the legs.

Selected reference images:

Final works: