Week10_Rendering and Project Reflection

This week we’ve been working on rendering and compositing. My task was to set up the camera in the base scene we had created and match it with the camera we had shot. I did this by putting in two standard models of similar proportions to our actors, then importing a frame into the camera and matching it so that we could match the footage we had shot relatively accurately.
If it’s a pure effect shot, I use Maya’s playblast to shoot the screen first and then give the director confirmation of the motion picture before rendering the start and end frames, which minimises rendering time.
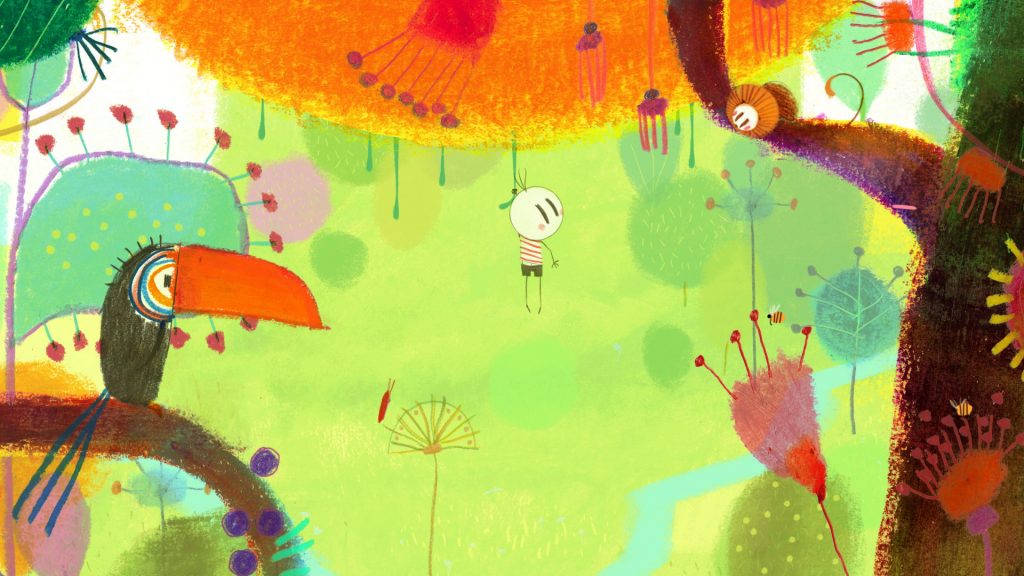
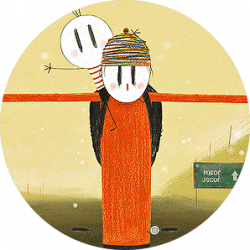
The Last Ai

Video link:

Reflection:

Overall, I think our project was very good, despite the many difficulties encountered during the production process. The biggest challenge for me was working with the director. Filmmaking and animation are completely different workflows. During the filmmaking, the director can shoot a lot of material for post-production editing, but not animation, where you have to do all the pre-production work and decide on every shot before you start. As none of us had any experience of making special effects films, we did a lot of useless work, including reworking scenes and key shots. With this experience, I will make sure to prepare well in advance for future projects. Secondly, I also found a serious problem in the final rendering process, which is the naming of the shots, as in a film project a shot is named as a unit, which may be used several times in the finished film. However, in an animation project, we name the shots as a unit according to the one shot of the finished film. This leads to confusion in the files, but it’s a good thing we didn’t have too many shots for this project, otherwise, it would have caused a lot of trouble.
I feel a sense of achievement when I finish a project and see the finished product. Maybe that’s why I chose animation as my major, to keep the love of it alive through the process of trial and error.

Week09_Rendering and Compositing

This week I found that I had missed a couple of important effects shots, one of Noma dismantling itself, one of the arm falling off and one of Steven dropping the remote control.
I downloaded the Noma robot model from the internet and I made a few modifications according to the image of our actor to make the Noma robot look as realistic as possible, and secondly, I created the mapping for the model, as well as creating the bones and binding them mechanically. After the preparations were complete, I created a movement of noma dismantling her own arm, which I did mainly from my own imagination and by having the actor noma do a similar move during the shoot on location on the 10th.

I exported the model to C4D and used C4D’s rigid body effects to complete it, then exported it back to Maya in ABC format for rendering, C4D’s rigid body effects are more realistic than Maya’s, and Maya always wears out the mould during production, so I simply switched to another software for production.


I also intended to use a rigid body to make the remote control fall, because it was simpler and more realistic, but after I finished the simulation, I found that the action of the remote control fall was not good, so I had to set the keyframe manually to complete the way.

Rendering will continue next week.

Week08_Lighting and Scene Optimization&Rendering Tests

This week I have continued to optimise the base scenes by changing the vertical lighting to horizontal and optimising the glass display cases by adding some dirty stains to the glass.

I then put this background into the Mengyang keying sequence, and the composite is as follows.

This week I also finished the last shot of the project, it was based on the opening shot, the director wanted the big robot to have a shattering effect at the end, I put the model into c4D for the effects and then imported it into Maya for the mapping render.

Most of the scenes have been created and the next stage is rendering and compositing, the finished film is just around the corner.

This week I made some optimizations for the bottle project, making a hand for the bottle and holding it, and a small scene with high quality render. After that, they did some text effects in PS and made some optimizations.

The final result is as follows.

Week07_Scene Optimisation& Rendering Tests

This week I’ve been organising the project files and doing the rendering tests. I chose the following rendering settings.

After that, I recreated the exterior of the base and we envisioned the whole base as a tomb, with Steven walking inside. As before I used world creator to create the terrain, the base was a simple box. I then expanded its UV and imported it into the substance painter for the texture mapping. Finally, I set up the lighting. The scenes are as follows.

For the wine bottle project, I worked on the bottle material this week, set up the lighting and did the initial rendering, I also made a box according to their requirements and added a velvet effect.

It is a bit tiring to work on two projects at the same time. But when I saw that they were very satisfied with the renderings, I was very happy and I felt like a dream realizer.

Week06_Compositing Test

This week I’ve been doing some compositing tests, we’re not sure of the final result so far, so this week I’ve been working with the director to sort out the footage and cut a final film without effects using PR software. we will follow the footage from the finished film, which will reduce our workload a bit.

Firstly I did a camera inverse on a motion shot in 3DEqualizer, which is exactly what dom taught us last semester, and it allows for very accurate camera inversion. The tracking results are as follows.

The value of 0.2 in the lower right-hand corner shows that the inverse result is relatively accurate, and Dom says that a result of less than 1 is acceptable. I then imported the inverse camera into Maya and placed it in the base scene we had built earlier.

The results look good now, but there is still a lot of work to be done before the film is ready. I also added some light effects to the scene in the first shot to give it a more detailed look. This also multiplied the rendering time.

The deadline is coming and I feel so much pressure because we still have a lot of footage to produce. We have to speed things up. Next week I’ll continue to optimize some scenes and get a render farm to help us render them.

In addition, This week I was approached by branding students who wanted to work with me on a group project. They are planning to make a Chivas bottle, they have designed the concept and the general image of the bottle, I am responsible for modelling, materials, lighting and rendering. This week I have been modelling based on their sketches, after a thorough discussion.

Project description:

Today’s young people are more discerning than ever, they generally like to share their lifestyles, try new things and show their infinite possibilities. Chivas Regal now wants to establish itself as an ideal choice for the new generation of luxury consumers and it is in need of a design that expresses a young identity and distinctive taste. So we will give the next generation of hustlers a better reason to love Chivas Regal.

Week05_Modelling of Base Scenes

This week I have been concentrating on making models of the base, both indoor and outdoor. Initially, I discussed with the director that the interior scenes did not need to be too complicated and that the backgrounds should be as black as possible, but after we shot in the green room, the lighting conditions were so limited that we had to change the scenes we had designed before to match the lighting. This increased my workload considerably. As before I searched for a large number of references, some of which are as follows.

There is a little trick when modelling in Maya, I found a standard mannequin to put in the scene and used it as a yardstick to build the interior scene. The initial result is as follows:

Obviously, the result was not satisfactory, firstly the space felt very small like it was in a corridor, and secondly, we had planned to put a bunch of plumbing-like parts along the wall, but it didn’t seem to have any real meaning in the picture. So I continued to modify it and got the following results:

The result looks good. Then I have since created an outdoor model of the base, which is shown below.

I’ll probably continue to work on these two scenes next week, but it looks like we don’t have much time left, we still have a lot of shots to finish, and I’m not sure how we’ll end up with a composite. Go for it!

Week04_Setting Up the Place&Green Screen Shooting

This week we finalised the final script and the dialogue lines for the cast

Furthermore, we booked the green screen classroom for Thursday and on Wednesday the group worked together to set up the classroom, finalise the camera and cast positions etc.

Here are some photos from the set

On the 10th we took a day of shooting. Here are some photos from the set

As you can see from the pictures, I was mainly responsible for making sure that the actors were surrounded by the green screen, and due to lack of staff, I also took on the radio duties. This was my first time working on a production and it was a lot of work and a lot of fun. I learnt a lot from being involved in the whole process. At the end we had the actors do individual dubbing to ensure the sound effects in post.

Week03_Find References&Scene Modelling

This week we have contacted two professional actors to act for us for free. They were very professional and enthusiastic and they helped us to modify our dialogues. As for me, I focus on scene modelling. According to our story style, Leo and I find some references

Based on these reference images, I modelled the scene using Maya. I mainly found some architectural models on the internet and placed them in the scene. With the following results.

The effect was not satisfactory, we felt it was not shocking enough as the scene was the first shot and we wanted to have a more powerful shooting, so we changed our mind and recreated it. I spent half a day briefly learning the basics of this software, and then I edited the terrain according to the reference images. With the following results.

The effect looked better, but the image still lacked impact, so we continue to find some references, like these.

I have added some details to the previous terrain and added a large robot to make the image more relevant to the theme. Also, the director suggested that I make the camera lookup, which really makes the image very powerful, and I think it’s very nice.

Next week we will be shooting in the green screen classroom. Let’s look forward to it.

Week02_Work Presentation& Short Film Proposal

This week we refined the story, found a lot of references on the internet (pictures, videos, etc.) and organized the work in a specific way. We ended up with a detailed proposal.

For my part, I experimented with the initial effects (part of it). In the video, I needed to create an effect where the hand corrodes to reveal the metal bones. I searched the internet for references and tutorials, but none of them was satisfactory. I eventually found Andrew Kramer’s tutorial video, where he created a metal font corrosion effect. I put his ideas to the test.

This is the experimental test process:

Here is the final result of the tutorial

This is the effect on the arm:

The result is not satisfactory and I think there are still a lot of problems, especially with the lighting and shadows.

This is the result of the improvement

It looks much better, but I think it’s still not realistic enough and the skin looks not thick, I will continue to improve it next week and add some flying flakes to the effect.

There is the proposal:

Thanks for Watching

Week01_Group Building and Theme Setting

The Last AI

Project Brief:

This is a short film exploring difference, humanity and technology working with Film major students. The film will be shot using live-action and post-production special effects compositing. The story takes place in a future where humans fear that the technology they create will rule them. They lead to a series of anti-technology movements, one of which is the destruction of AI robots

Story Brief:

When only one robot named Noma is left in the world, the person sent to hang her is Steven, the professor who created her at the time. Noma has almost human-like feelings and consciousness, and she is based on the image of Steven’s deceased daughter. When they meet, a conversation ensues…

Reference Style:

Team Members:

Director & Screenwriter: Bin Li

Executive Producer: Mao Lin

Cameraman: Mingxuan Yang

Post-Production: Mengyang Yin, Yaozhang Zhong

Task Assignment

After discussion with the team, I was responsible for modelling the character Noma, mapping and binding, post compositing and special effects for this project.

Aiming to get and career direction:

In this project, I hope to learn some of the ways of storytelling and audiovisual expression in a film that I can use in my future animations. I have always believed that a good animation film is not defined by its beautiful images or advanced technology, but by the content of the story and the methods in which it is narrated, so I hope that I will be working in the creation of animation rather than the production of animation.