Week10_Project 2 Summary

I have finally finished project 2. I have learnt a lot from this project and have enjoyed the workflow of Maya and Unreal Engine as it has really improved efficiency.

This is an experimental version of the FMP project and I am concentrating more on the whole workflow. This project is more of a Demoreel than a core story for now, and it can be considered as technical preparation and testing for my last major project.

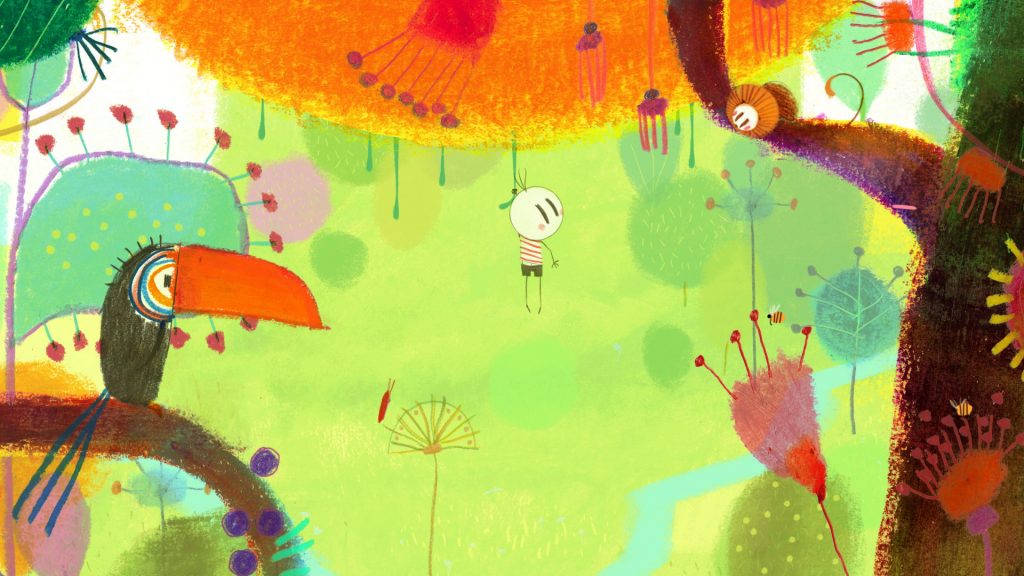
For my Final Major Project, I wanted to make a short film with a philosophical theme. The main idea of this film is to tell the story of Zhuang Zhou’s sleepwalking. It is different from other short story films. The film might be based on some Chinese and Western philosophical concepts or ideas.

In order to have a more beautiful picture, this short film may have some visual effects such as sand, snow, etc. To create a special ambience. I will then spend time working on the production of the scenes, enriching them and making them more beautiful. I will be working on this in early July.

My main software will be Maya, but I will also try to learn Houdini, which can produce a lot of very realistic effects. At the end of this project, I completed several scenes, lighting and test renderings. These techniques will also be used in my FMP project.

During the production of this project, I encountered some problems and realised the limitations of my hardware. As a result, I found out what areas I need to focus on next and what kind of hardware I need to prepare for my FMP. I also got some feedback from my classmates, which helped me a lot. All these reflections have been very valuable and useful.

Next month I will start preparing for my FMP project. These reflections will also help me to prepare scripts and storyboards and to control the time budget and speed of the process.

Blog Link:

Week01_Inspiration & Reference

Week02_Storyline & Reference & Technique Challenge

Week03_Preparing for Unreal Engine 4

Week04_Assets Collection & Create a terrain in UE4

Week05_Create a Forest Scene

Week06_Create Mountain Scene & Lighting Test

Week7_Maya Animation to UE4

Week08_Creating Iceberg and desert Scene

Week09_Rendering Test

Week09_Rendering Test

This week I finished lighting the desert scene and imported the whale animation into the scene for a test render.
I added two fog effects to the desert scene to make it look more realistic, one is atmospheric fog and the other is height fog, the height fog can be achieved depending on the distance of the scene. The effect is very good. I adjusted its colour to make the scene look more like it was in the middle of a hot desert.

Next, I did some rendering tests. Unlike Maya, Unreal Engine 4 renders need to add transitions and then add the camera to the sequence, and the camera animation needs to be made in the sequence, which is a bit tricky compared to Maya. However, the advantage of Unreal Engine 4 is its rendering speed, as it renders almost as soon as it is played, which is very fast.

Week01_INSPIRATION & Reference

inspiration

I started with the idea of making an animated short film with a strong narrative story, but then I felt that with only four months to make FMP and the fact that it would be difficult for me to make a very high-quality narrative short film on my own, as I had to consider the story, the characters, the events and the music, more importantly, it would be difficult to tell a good story within a minute or two. Overall, I decided to make a surrealistic animated short film, not only with refined graphics but also with a strong philosophical concept. After a series of research, I decided to make a story about Zhuang Zhou, who was one of the greatest thinkers and philosophers of ancient China. One of his philosophical stories is about one day he dreamt that he had turned into a butterfly, and when he woke up, he wondered: did I dream of the butterfly or did the butterfly dream of me. He believes that sometimes it is difficult to distinguish between dreams and reality and that dreams can sometimes give us a sense of reality, while reality can also give us a sense of being in a dream. This reminds me that our universe is made up of countless planets, with small planets revolving around big ones, a structure very similar to the molecules, so is it possible that we are just a tinny part of God? To put it another angle, are we the gods of others? In the follow-up study, I found that I could possibly combine Zhuang Zhou’s theory with Freud’s theory of personality, the id represents the most basic unit of our world – the molecule, the ego represents our original world, and the superego refers to the world of God which is composed by our world.

Reference

Week10_Project 1 Summary

The Deep Mist (A Cthulhu Style CG Trailer)

Showreel:

Team Members and Roles:

Zhenzhong Liang: Story; Storyboard; Character Modeling; Character Texturing; Main Editing; Compositing;

Ziyin Wang: Story; Storyboard; Creature Eye Modeling; Creature Eye Texturing; Animation; Compositing;

Yaozhang Zhong: Story; Storyboard; Environment Layout; Lighting; Camera Animation; Rendering; Compositing;

Guanze Wu: Story; Storyboard; Rigging; Environment Layout; Lighting; Camera Animation; Rendering; Compositing;

story brief:

The year 2025, the organization detects that an abnormal radiation signal is expanding in the restricted area. Several inspectors have been sent to the area to investigate the signal and collect evidence, but the base lost contact soon. Therefore, the organization asks two inspectors to continue collecting evidence and try to find the investigation team.
The investigation goes well at the beginning. However, as the investigation expanded, inspectors find some bodies of the investigation team. They also find a mysterious cave inside the abandoned area. After entered in the cave, they realized that there is some mysterious forces inside the area……

Storyboard

We made our own version of the storyboard based on the work we had agreed to do and then put together a collage of everyone’s storyboards to form a complete version.

Reflections


For me, this project was a lot of fun. We used a combination of a new animation process to complete our trailer. More importantly, I explored Unreal Engine 4 and other technologies, which was probably one of the biggest challenges for me on this project. Maya and Unreal Engine 4 combined to significantly speed up our process, especially the rendering time, which was convenient and easy to use.

Also, some parts of the project didn’t have enough time to be polished due to the very limited time available. I think we could have continued to optimise our lighting and animation if we had had time. Nevertheless, we have achieved our goals in this project. I learned a lot from it and enjoyed it.

Week09_Rendering & Compositing

This week I focused on rendering all the scenes I was responsible for and compositing the shots.

The shots I was responsible for were all rendered in Unreal Engine 4.

I used the post-processing volume in Unreal Engine to adjust the colour and contrast, and for one of the close-ups, I exported the z-channel and then did a simple depth-of-field composite in Nuke.

I chose blue-green as the primary colour for these shots. I used colour correction in PR to adjust the colour and contrast. I then added motion blur, vignetting and camera grain to these shots.

Finally, I put all the shots together and edited them in PR. The initial edit file was already set up for us by Zhenzhong. So I was able to replace the assets in his file and finish the edit very quickly. I only changed some shot sequences to make the pacing more satisfying.
Then I exported the final video. The quality of it was very satisfying. I really like the atmosphere in the final trailer. The final video will be posted on the submission post

Week08_Creation of Full Shot Scene & Camera Animation

This week I have been concentrating on our opening shot, which is a large panorama involving a lot of terrains, vegetation, trees etc. Based on my previous experience, I started by finding some reference scenes on Pinterest that fit the scene, and then started with the terrain, editing the terrain a little bit, the good thing is that the terrain doesn’t need to be very precise compared to the model, it just needs a rough shape. I then planned some rivers and roads on the terrain to give a sense of hierarchy to the whole forest. Secondly, as I was making a push shot, I divided my shot into three parts based on the reference image: foreground, middle and background.

Some References

I mainly focused on making the middle scene, making the peaks according to the reference, and then using the vegetation brush to paint the trees in layers, the idea of making this big scene is the same as the previous two scenes, but because this scene involves too many objects, even Unreal Engine 4 often lags or even flickers

I created the background using Worldcreater, which I had already used in my co-op unit the last term. I only created one mountain, the others were rotated and scaled to create some sense of difference.

After some discussion this week, I decided to add some camera animation to make the scenes look less stagnant.

Unreal Engine 4 animation is very different from Maya, I created a new sequence, added the camera into the sequence and set the camera animation in the sequence.

I then added some fog effects, added a sky sphere and modified the tone of the whole I then added some fog effects, added a sky sphere and modified the tone of the whole scene. The final result is as follows, you can see that the sky sphere I added doesn’t seem to match the scene, but the good thing is that as it is a distant scene, and I have modified the tone, there is no obvious difference.

I’ve finished all the scene set up and next week I’ll be importing Ziying’s animations into the Unreal engine and then finishing the final renders.

Week07_animation File Imported Into Unreal Engine 4 & Third Scene

Last week I gave Ziying the terrain I had already created to animate, so this week I started working on how to import the animations I had made in Maya into Unreal Engine 4. The skeletal system is different between the two software systems, so it was a bit difficult to get it into Unreal Engine 4.
The first thing I tried was to export the animation in abc format in Maya, and I found that although I had no problem importing the animation in this format, the abc format uses a material sphere by default, so I couldn’t reassign a material to my imported character. So I tried to use the exported fbx file format. But I still encountered two problems
1: The animations imported into Unreal Engine 4 are walking in place and not displaced.
2: The materials need to be completely reassigned.
My solution: problem 2 is relatively easy to solve, I just need to spend some more time rebuilding and specifying the mapping. Problem 1 I recreated the displacement animation in Unreal Engine 4. The animation in Unreal Engine 4 is a bit more complicated and cumbersome than in Maya, I had to be very careful with the positioning to avoid foot displacement.

After that, I started working on the third scene. The third scene is relatively straightforward, this one is a close-up with a scale in the foreground, the feet of two agents in the midground and the forest in the background. As it was a close-up I needed to set up the scene with much less content. I set up the camera according to the reference I found, and then placed the objects according to the camera screen. I replaced the scales with a sphere and the two agents with the basic human model from Unreal Engine 4.

Next week I’ll start working on the first panoramic scene, after which I’ll need to work on adding camera animations in Unreal Engine 4, which is looking very good so far. Keep up the good work!

Week06_Bloodstain Decal & Second Scene

This week I finished the first scene, added the blood decal effect to the scene and started building the second scene.
The principle of decals is to create a projection that projects the decal onto the object and adds bump, reflection and other effects.
I found some blood decals from the internet, created decal materials in Unreal Engine 4 and tested them. Here are the results.


I then placed the blood decal in the scene, but I found that the blood was not projected on the plants but directly on the ground, which was weird. After some research, I found that the reason for this was that I had used a plant brush to paint the plants, and they were not in the scene as a mesh. My solution was always. This gave my scene a lot more detail.

After completing the first scene, I started working on the second scene, which was a scene of two investigators searching the forest. With the experience from the first scene, the second scene went much more smoothly. There are a lot of resources, such as trees, rocks, terrain, etc., that are common. I also added some ferns to enrich the scene. I copied the lighting and fog from the first scene.
Nevertheless, I took some time to set up the scene so that the plants would look realistic; for example, the ferns would grow close to the big trees. I also placed the rocks according to a reference map I had found.

Next week I’ll be working on exporting animations from Maya to Unreal Engine 4, and I also need to export the scene that I’ve built to Ziying so he can do the animation. There are two more scenes I need to finish. Go for it!

Week05_Lighting Fog & Forest Scenes

This week I finished the first scene of our trailer: the forest scene, which will probably be optimised later in the production.
I started by working on how to create more realistic lighting in Unreal Engine 4 and testing various fog effects.


To give the lighting a more realistic effect, I used a dynamic material map to add shadow detail and give the lighting a wooded feel on the ground.


Lastly, I optimised the scene I had built last week so that it was surrounded by fog, giving it a misty forest feel and more closely matching the reference image I had found.

Next week I will be working on how to create decals in Unreal Engine 4, as this scene is a corpse pit scene with a lot of blood, I decided to use decals to create the blood effect.

Week04_Grass & First Scene

This week I’ve been working on the grass in Unreal Engine 4. In beginning, I downloaded a grass model from Bridge and Imported it into Unreal Engine 4 and then attached a texture to it, the result looks like this.

The result of this test was not satisfactory, the grass was very fake, I think it was the lack of dynamic effects, so I continued to study how to make the grass move, I used the WorlPosition Offset node, using a noise wave map to make the model swaying effect, and then use the two-dimensional gradient map to make the upper part of the grass move, the lower part of the grass does not move, so as to achieve the effect of wind blowing grass.

The results looked good, but I thought it lacked a bit of realism, so I used dynamic mapping to create a fake wind-blown wheat wave effect by connecting normal nodes. Make the grass look more realistic.

In addition, this week I also tried to build my first scene, using the resources I had found, such as trees, vegetation, rocks, branches, etc., to set up the scene based on the references I had found earlier.

Reference

Next week I will continue to work on how to add light effects in Unreal Engine and I will optimize the scene to add more details to achieve the effect we have in mind.